

Dahlia Tuber and Splitting Guide
With spring right around the corner and things warming up, I thought it would be a great time to start something I have wanted to do for a while: start a blog. I am hoping for this to be a casual thing, mostly talking about tips and tricks for growing or different happenings here on the farm. What a better way to to kick it off than with a review on dahlia tubers?!
Over the last five years we have split over 200,000 dahlias on our farm. At this point for us it is just muscle memory but for others it can be a real challenge. Questions about splitting and storing dahlia tubers are probably the most common I receive and seem to be what people struggle with the most when it comes to these beautiful flowers. In this post I am going to concentrate on the tubers themselves rather than on their storage. If you are interested in how to store tubers, make sure you check out our Dahlia Care page for some good information on that.
Dahlia Tubers
Just like people, different dahlia varieties have unique characteristics and come in many different shapes and sizes. Some might have long and skinny tubers, where others are short and fat. Some might produce lots of tubers per clump, and others might only be practical to propagate from cuttings because they produce few, if any viable tubers. Some store well, while others are notoriously difficult to store without them rotting or dehydrating. In short, when working with mother nature, you cannot look at tubers as an ‘off the shelf’ widget. Each one will be unique and there is no ‘standard’ shape or form for dahlia tubers across different varieties.
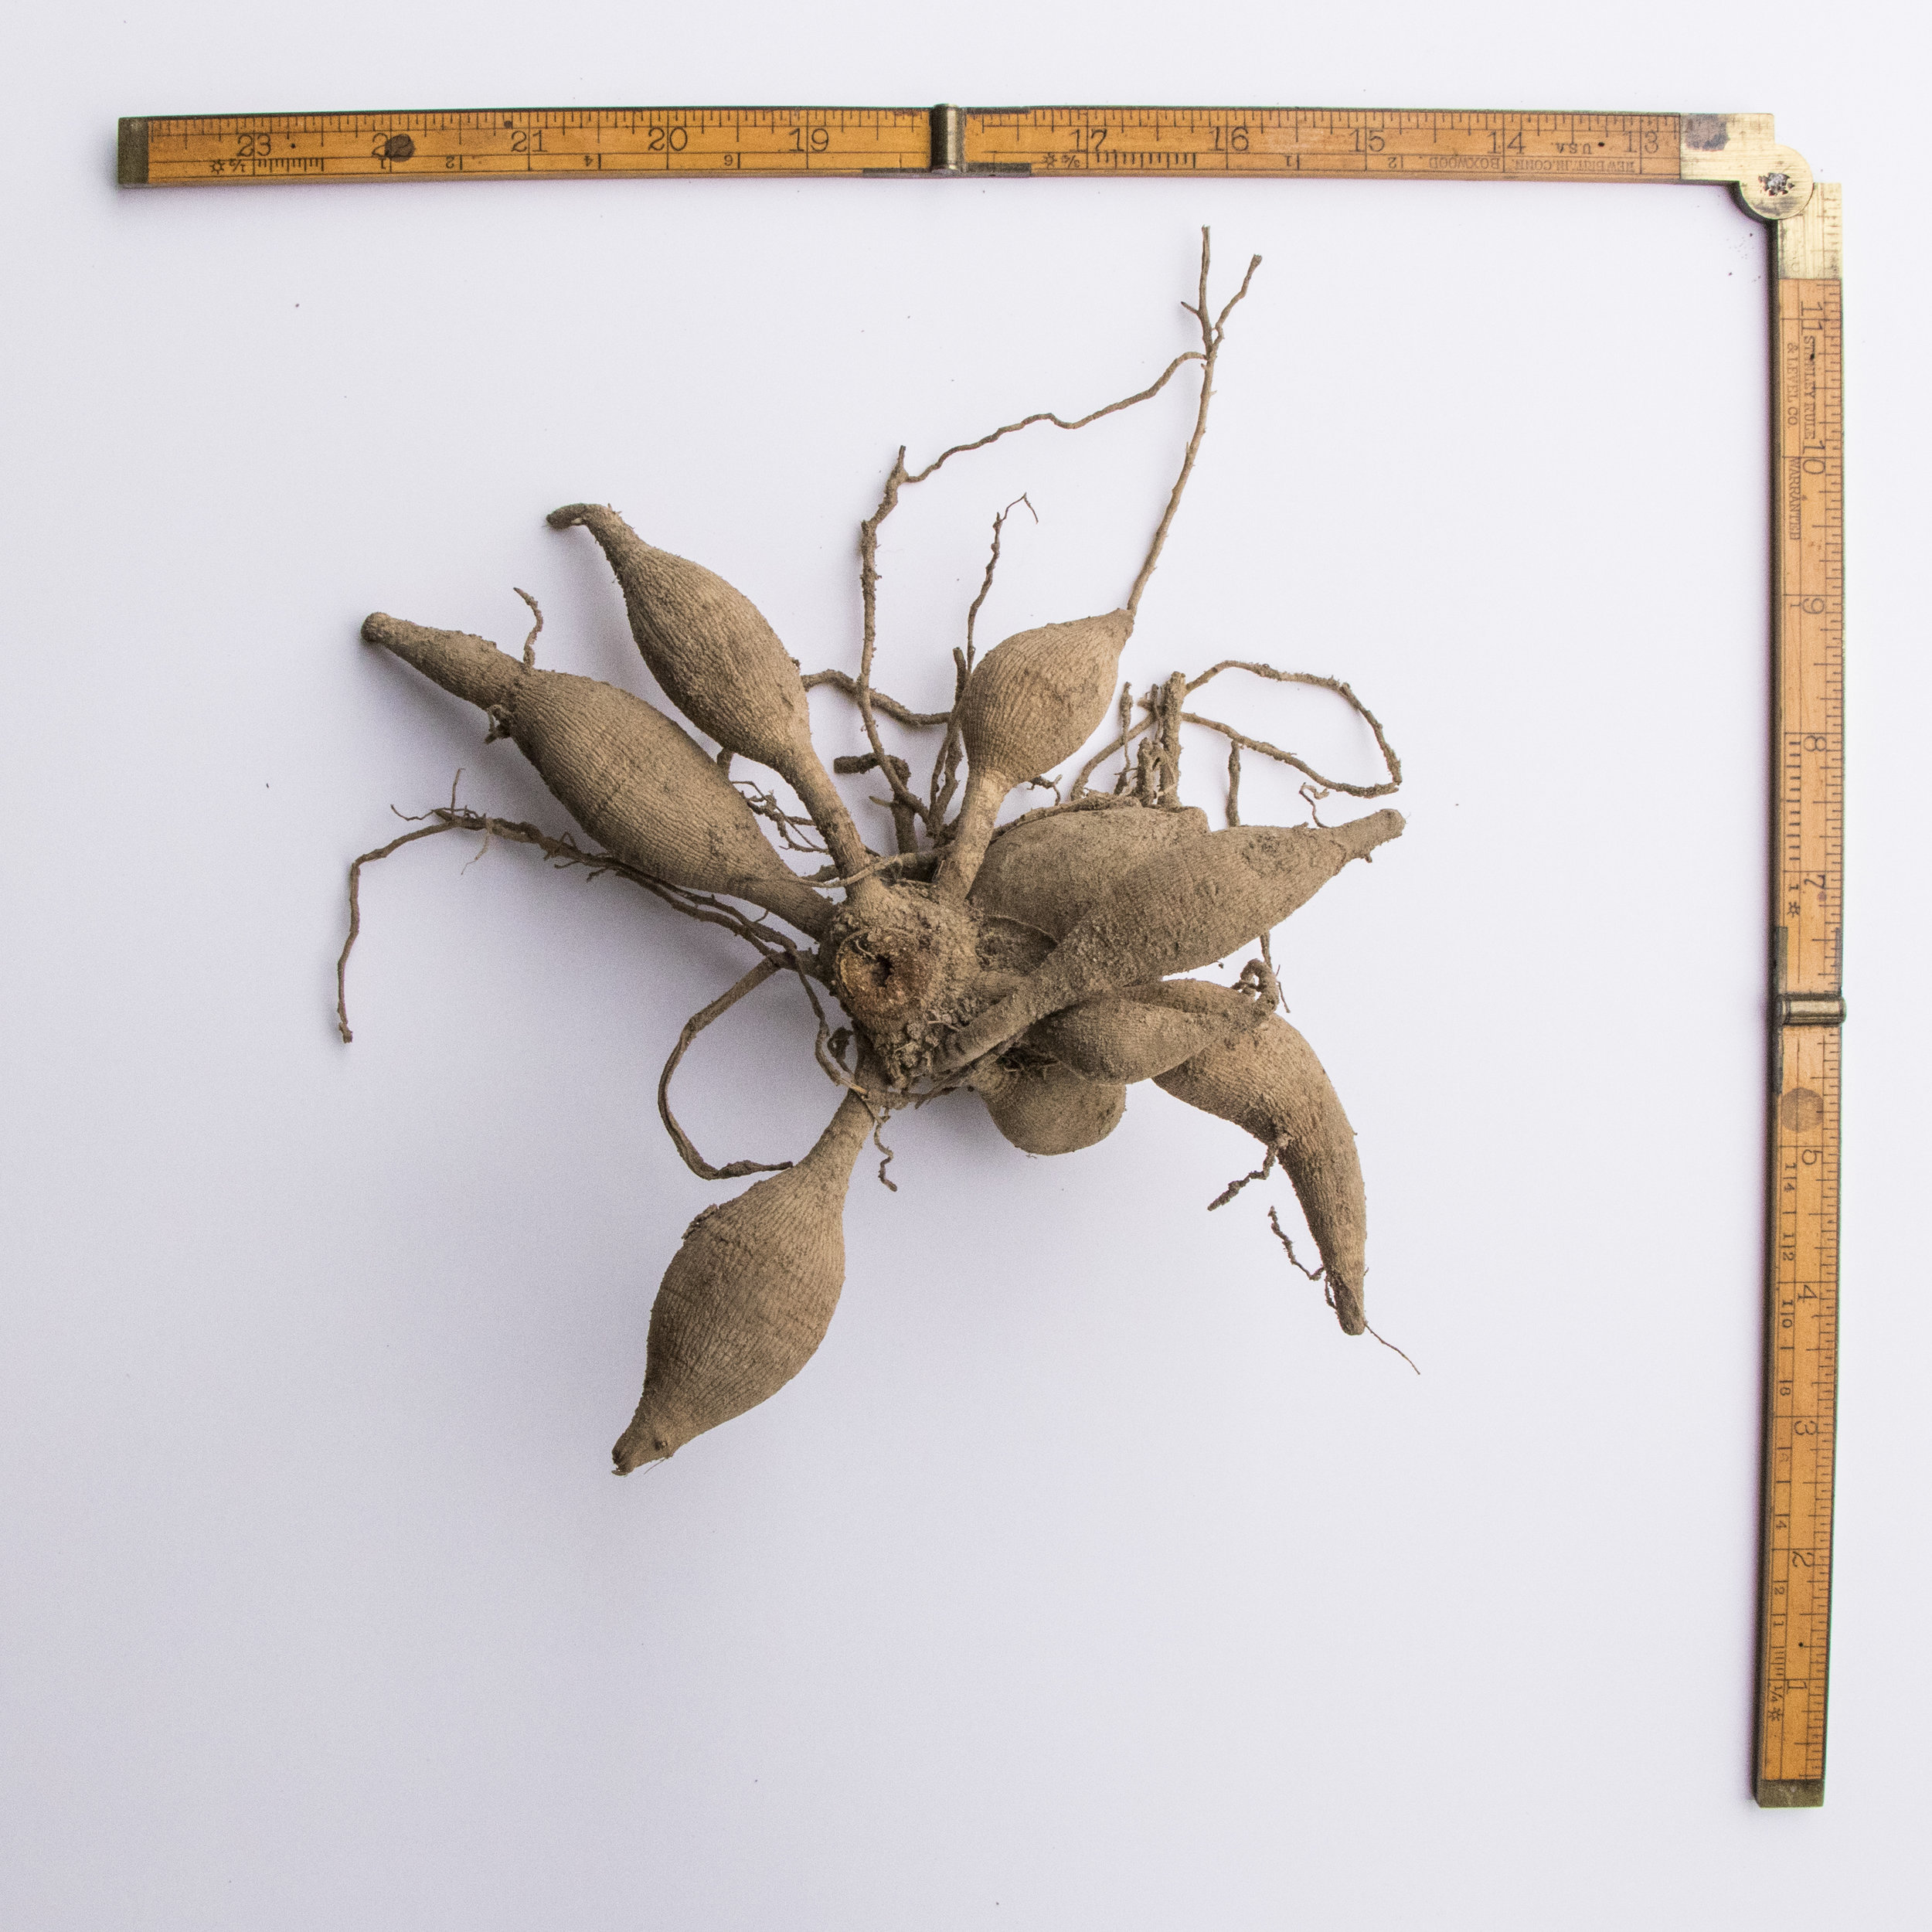
Here are some examples of different dahlia clumps that I pulled out of storage before they were split. This is what they look like when we put them into storage. There is still soil on them and they are not cleaned up too much yet.
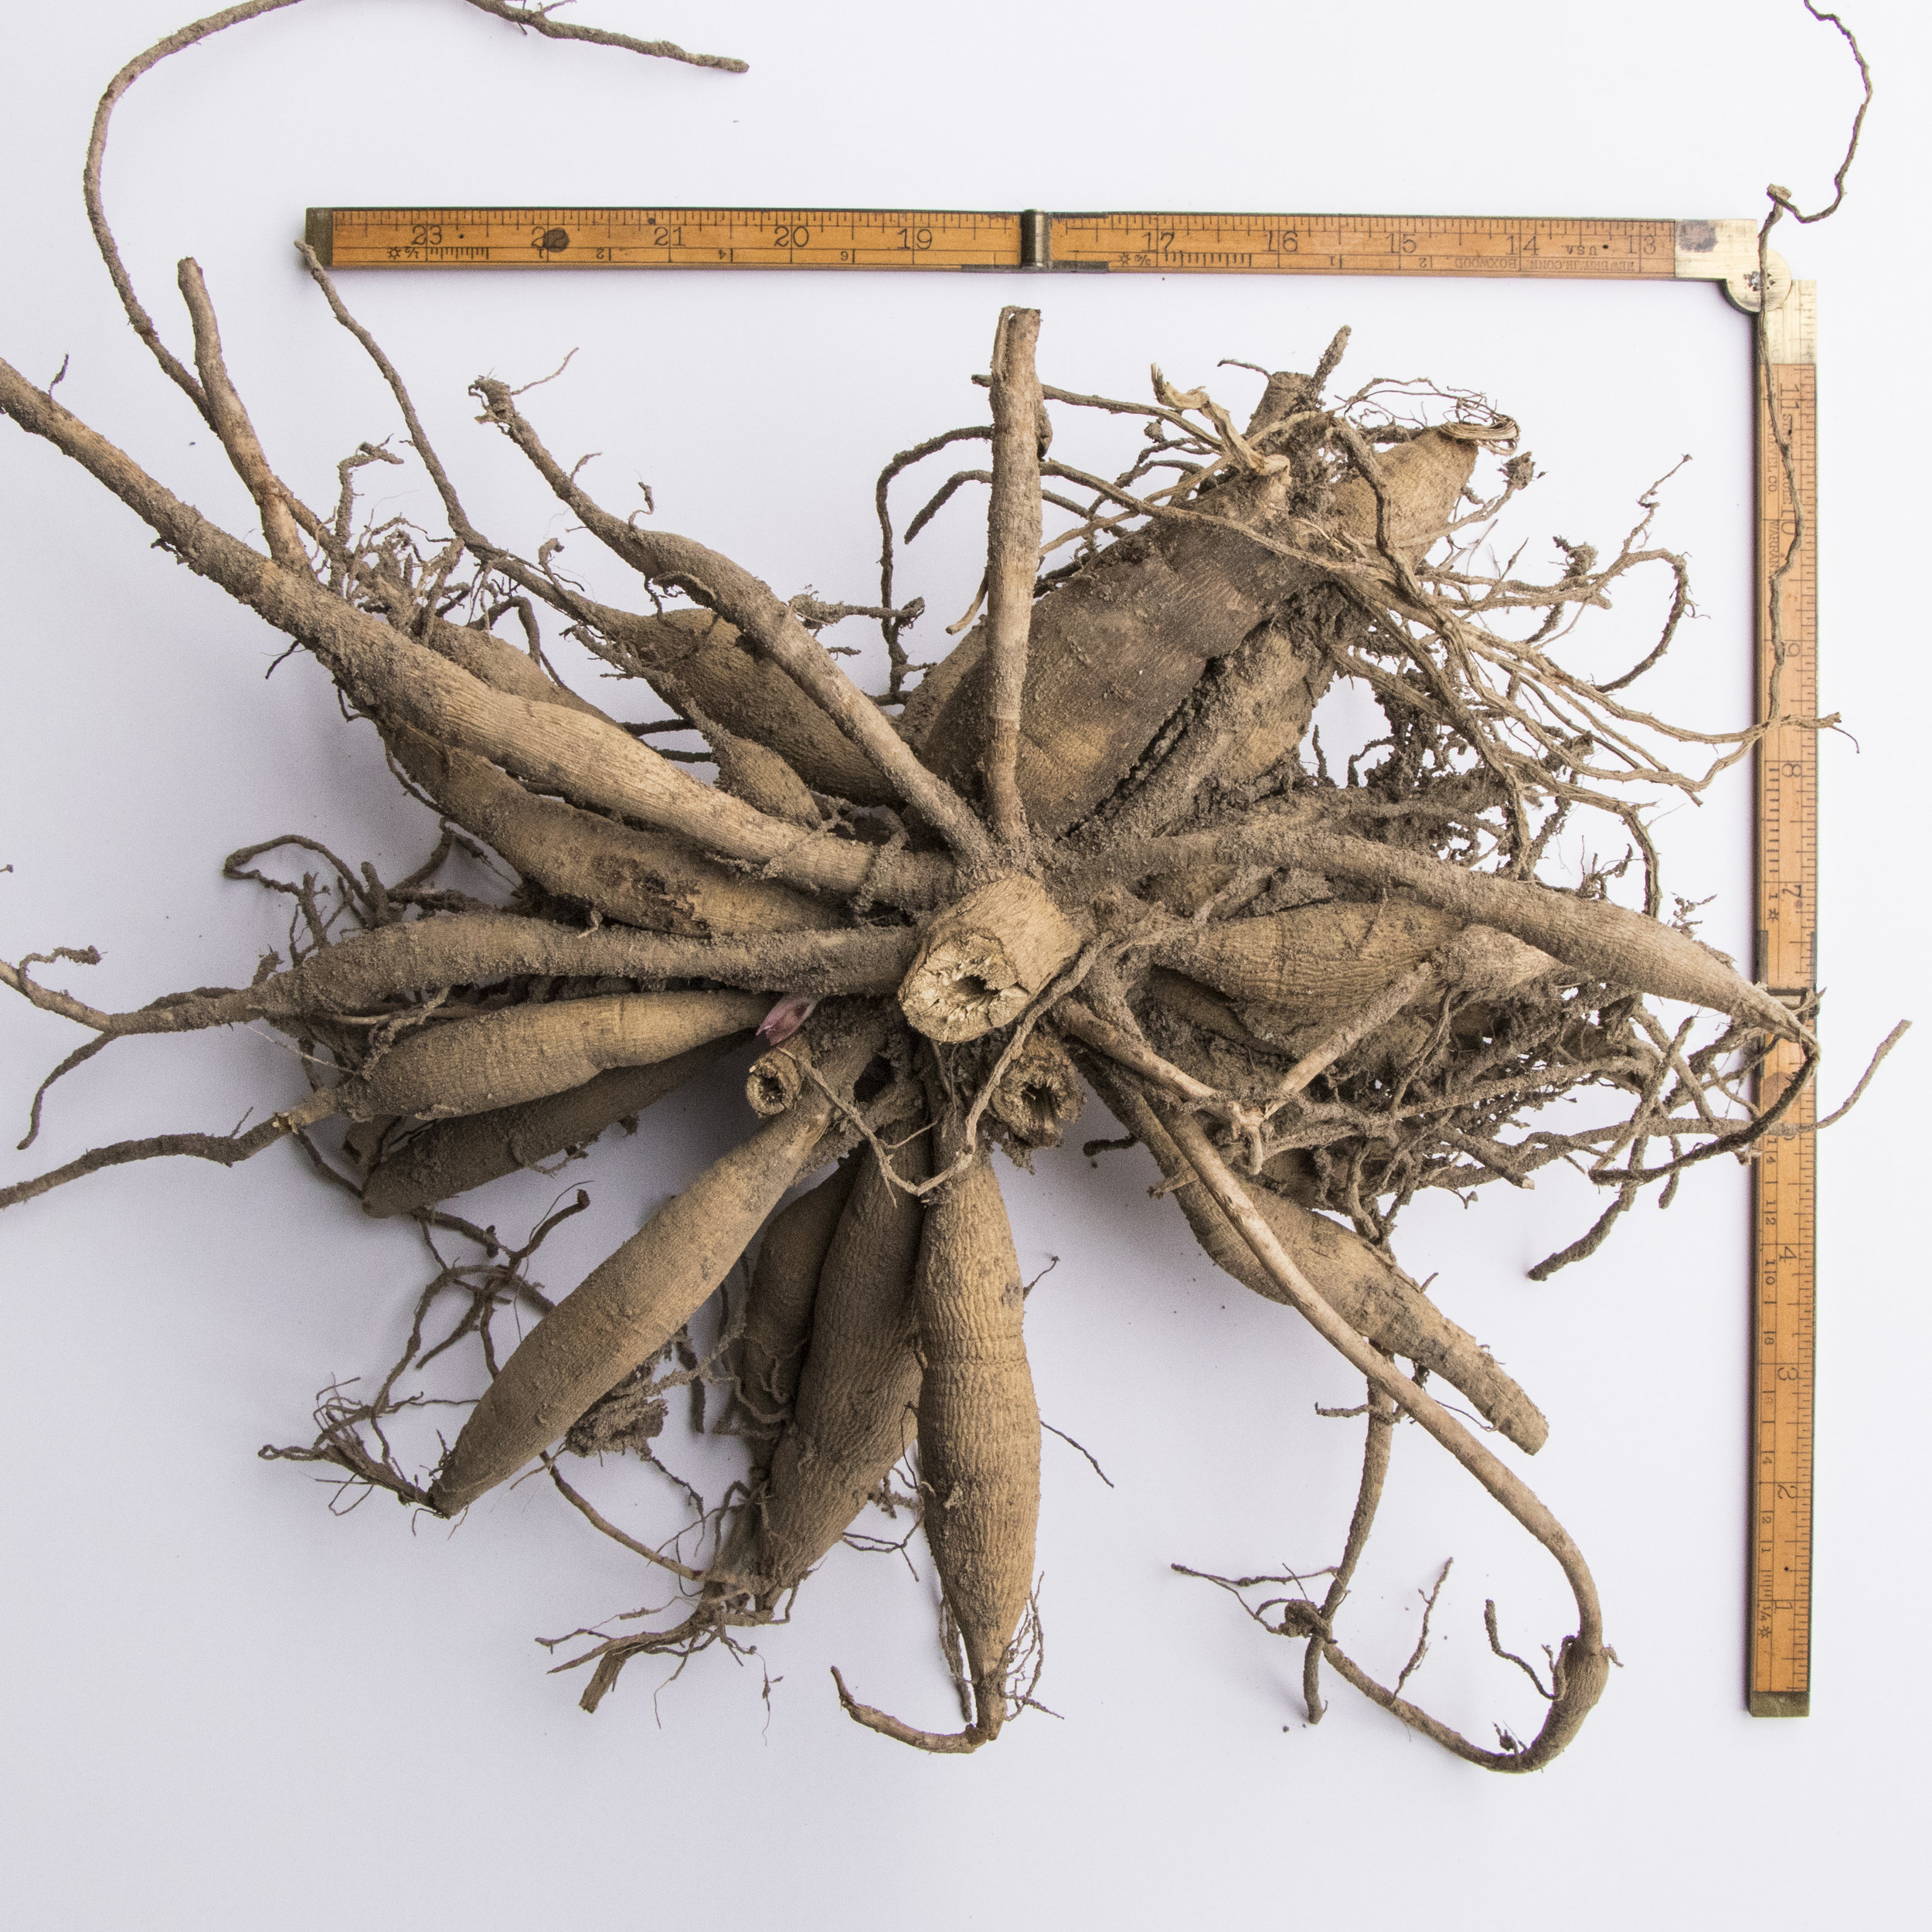
A typical clump of Rip City dahlia tubers. It is one of the most productive varieties we grow.
A little better than average clump of Sweet Nathalie dahlia tubers.

A clump of Sea Nugget dahlia tubers. The tubers are on the smaller side but a clump like this can easily split 5 or 6 times.
Size doesn’t Matter (mostly)
One common concern people have when they receive a dahlia tuber is, ‘This is so small. Will this produce a quality dahlia plant?”
When it comes to tubers, size doesn’t matter - to a point. Let’s step back for a second and ask, what is a dahlia tuber? A dahlia tuber is a tuberous root of a dahlia plant. It is a starchy body that contains food, water, and nutrition for a dahlia plant to grow until it establishes a root system that will then provide food for the plant.
As long a dahlia tuber is large enough to accomplish what I described above, it is big enough. So how big is that? When I am training new employees, I explain to them I want a tuber to be at least the size of my little finger (about the size of a AAA battery). Tubers smaller than that will produce a plant but it might not produce as many flowers. It should create quality tubers that can be divided for the following year. When I am shipping out tubers, regardless of the variety, I try to make sure the smallest tubers anyone receives are the size of a AA battery. Keep in mind that a tuber that is skinnier than I described is still OK if it is longer. The battery measure is more about total volume of the tuber than the thickness or length.

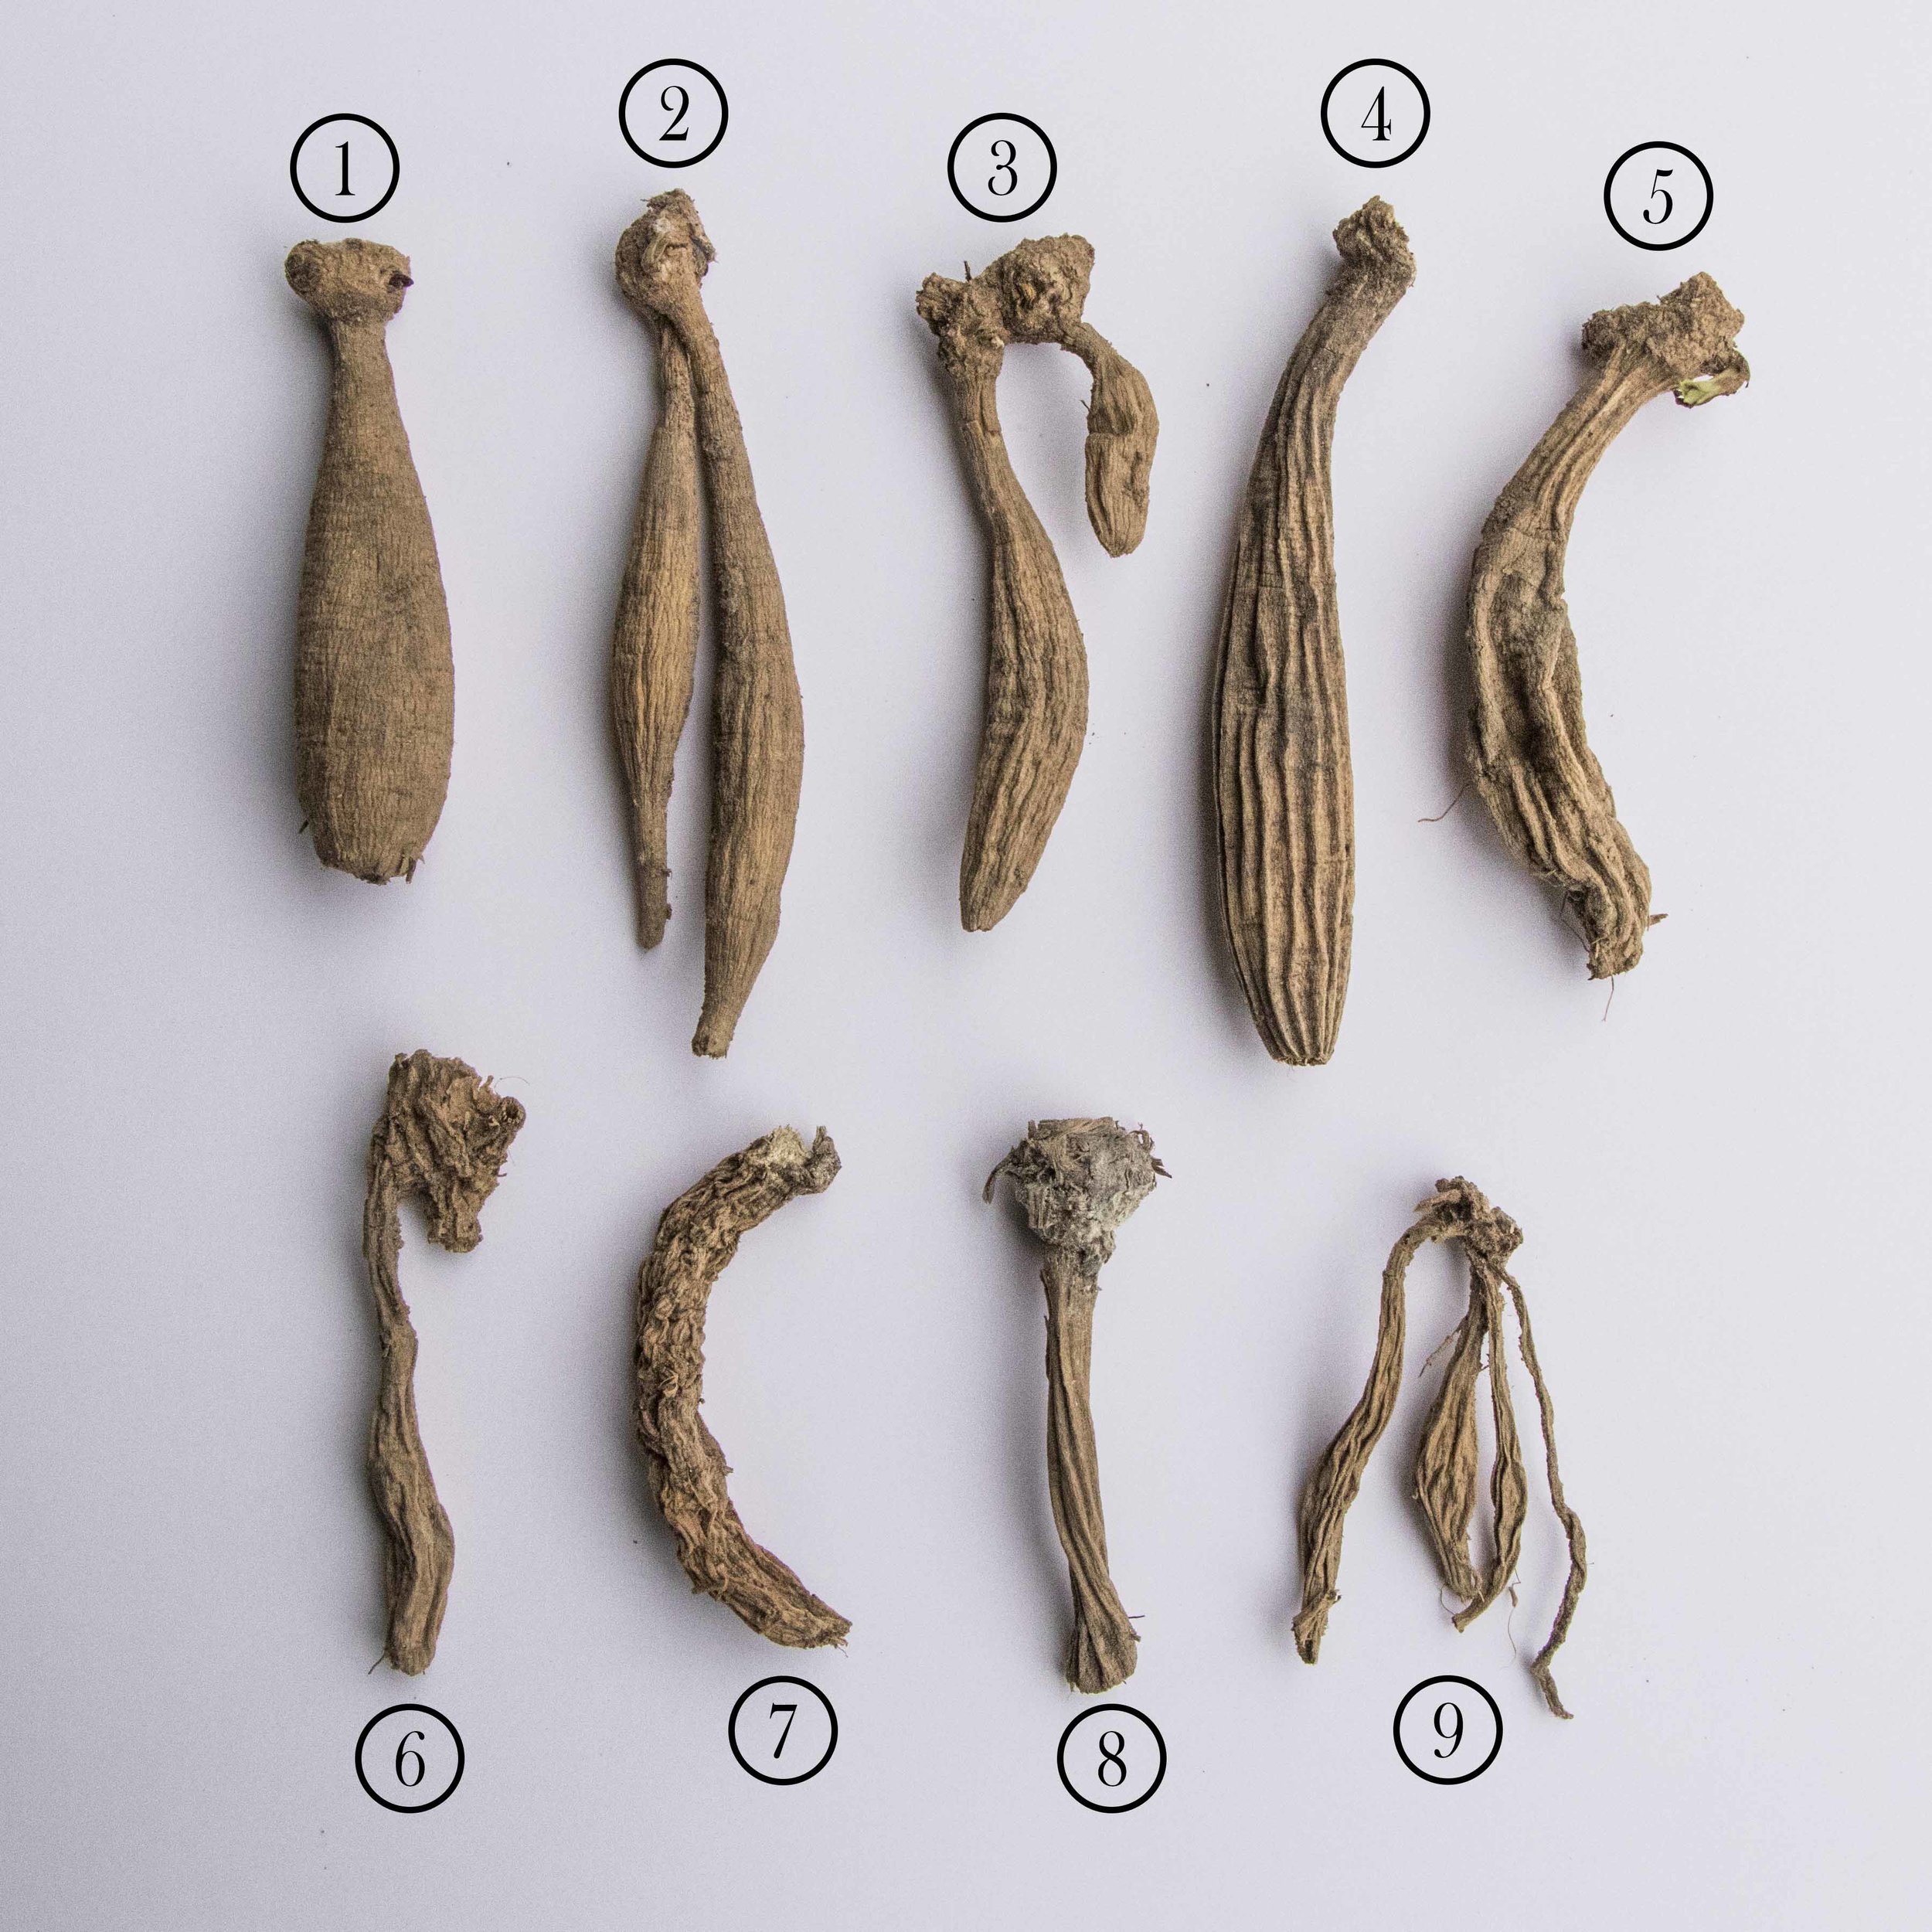
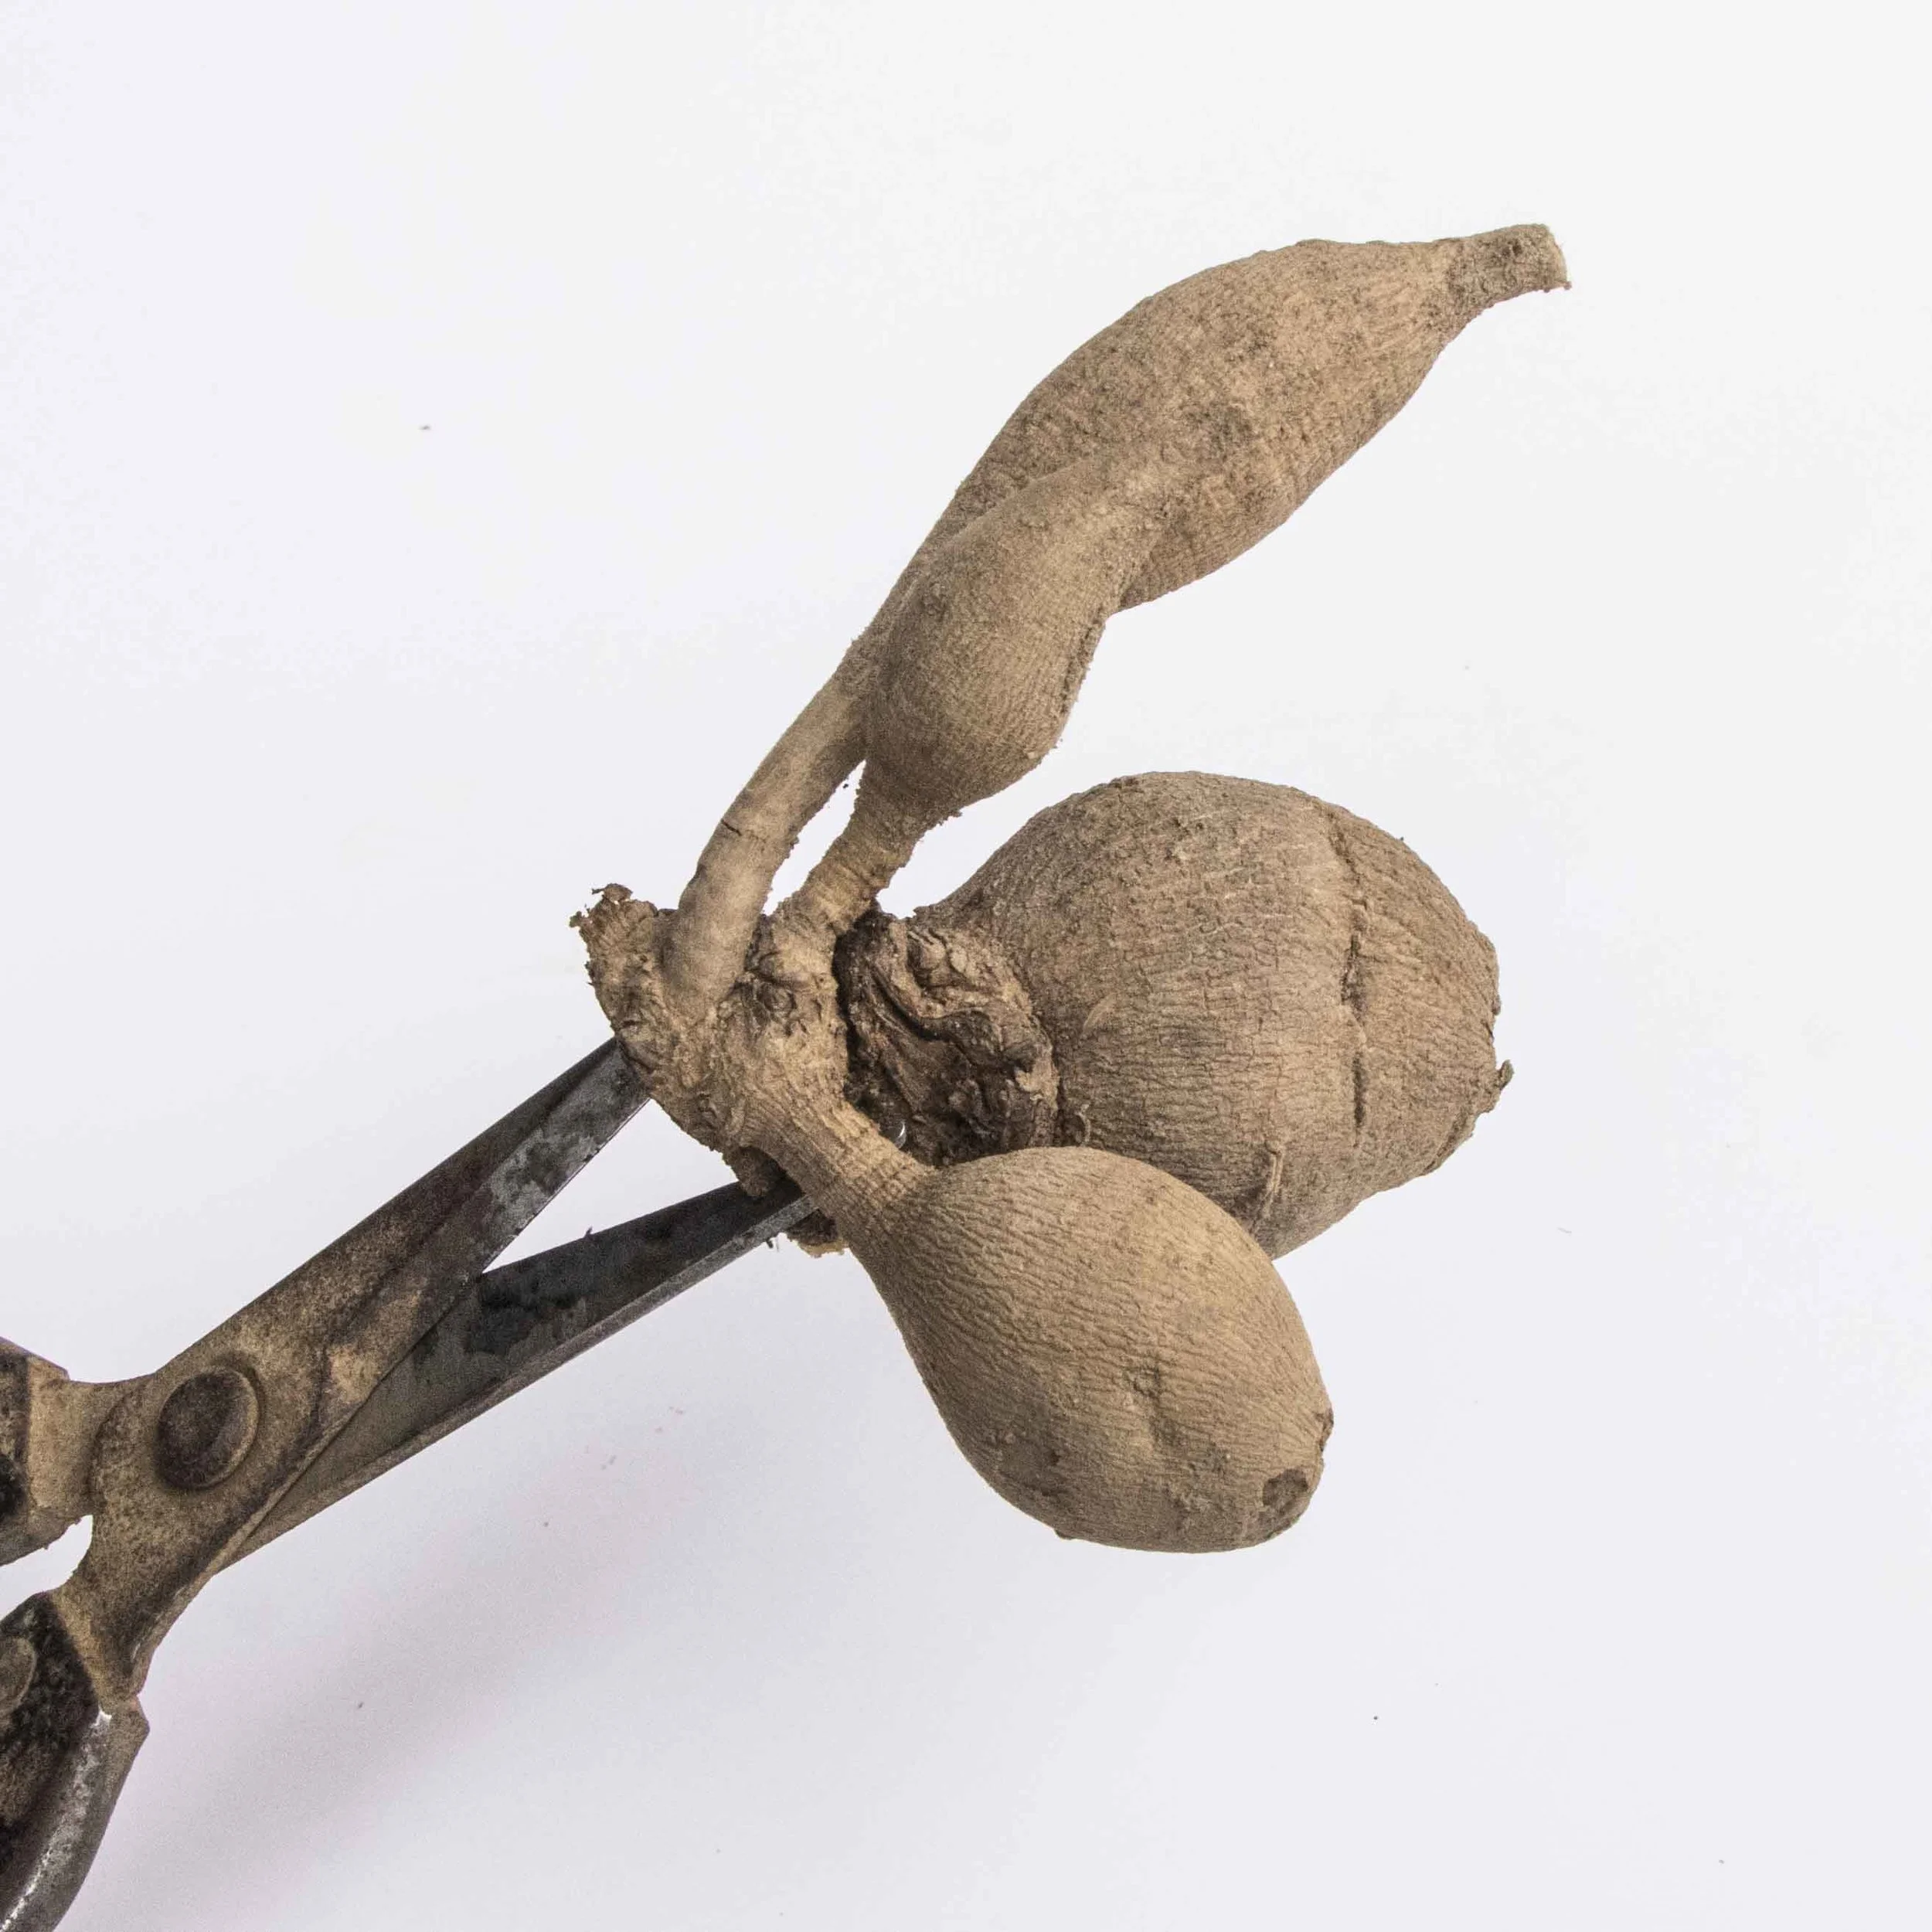
Representative examples of the variety of shapes and sizes dahlia tubers come in. AA battery for size reference.
1. Peaches n’ Cream
2. Blyton Softer Gleam
3. Bonanza
4. Cafe au Lait
5. Hamari Gold
In the photo above, you can see the variety of shapes and forms different tuber come in. These are all examples of quality tubers I wouldn’t question planting in my garden or on my farm. If I had to pick a perfect size tuber, I would want it to be around the size of the two Bonanza examples (#3 in the above photo). I want to stress that not all varieties will produce tubers that are that shape or size, nor do they need to be that size or shape to produce a high quality plant.
I also want to add that there is such a thing as “too big”. If a dahlia tuber is too large, it could actually backfire on it’s ability to produce more quality tubers or develop a large root system. You can think of it as the dahlia sitting on a reservoir of so much food and water that it doesn’t need to seek out more. The top of the plant might have been productive but when you dig these in the fall you can find a single mother tuber without any new tubers. How big is too big? In general, I don’t like it if they are too much bigger than your average size coffee mug.
Keep in mind if the plant normally produces many large tubers, like Ferncliff Copper for example, it is OK if the tubers you plant are larger. If you are concerned about a tuber being too large, you can cut a portion of the back half off the tuber to help promote more root growth.
Tuber Viability
Dried out tubers
Another common question I see on various flower forums is, “My tubers dried out in storage. Will these make it?”
Dahlias are survivors. I am always shocked each year when I go out to the compost pile in late June and find tons of dahlias growing out of what I thought to be a pile of trash. While they have a will to live, there are still basic things to look out for. Since a picture is worth a thousand words, I decided to go through my tuber storage and find some examples to show you.
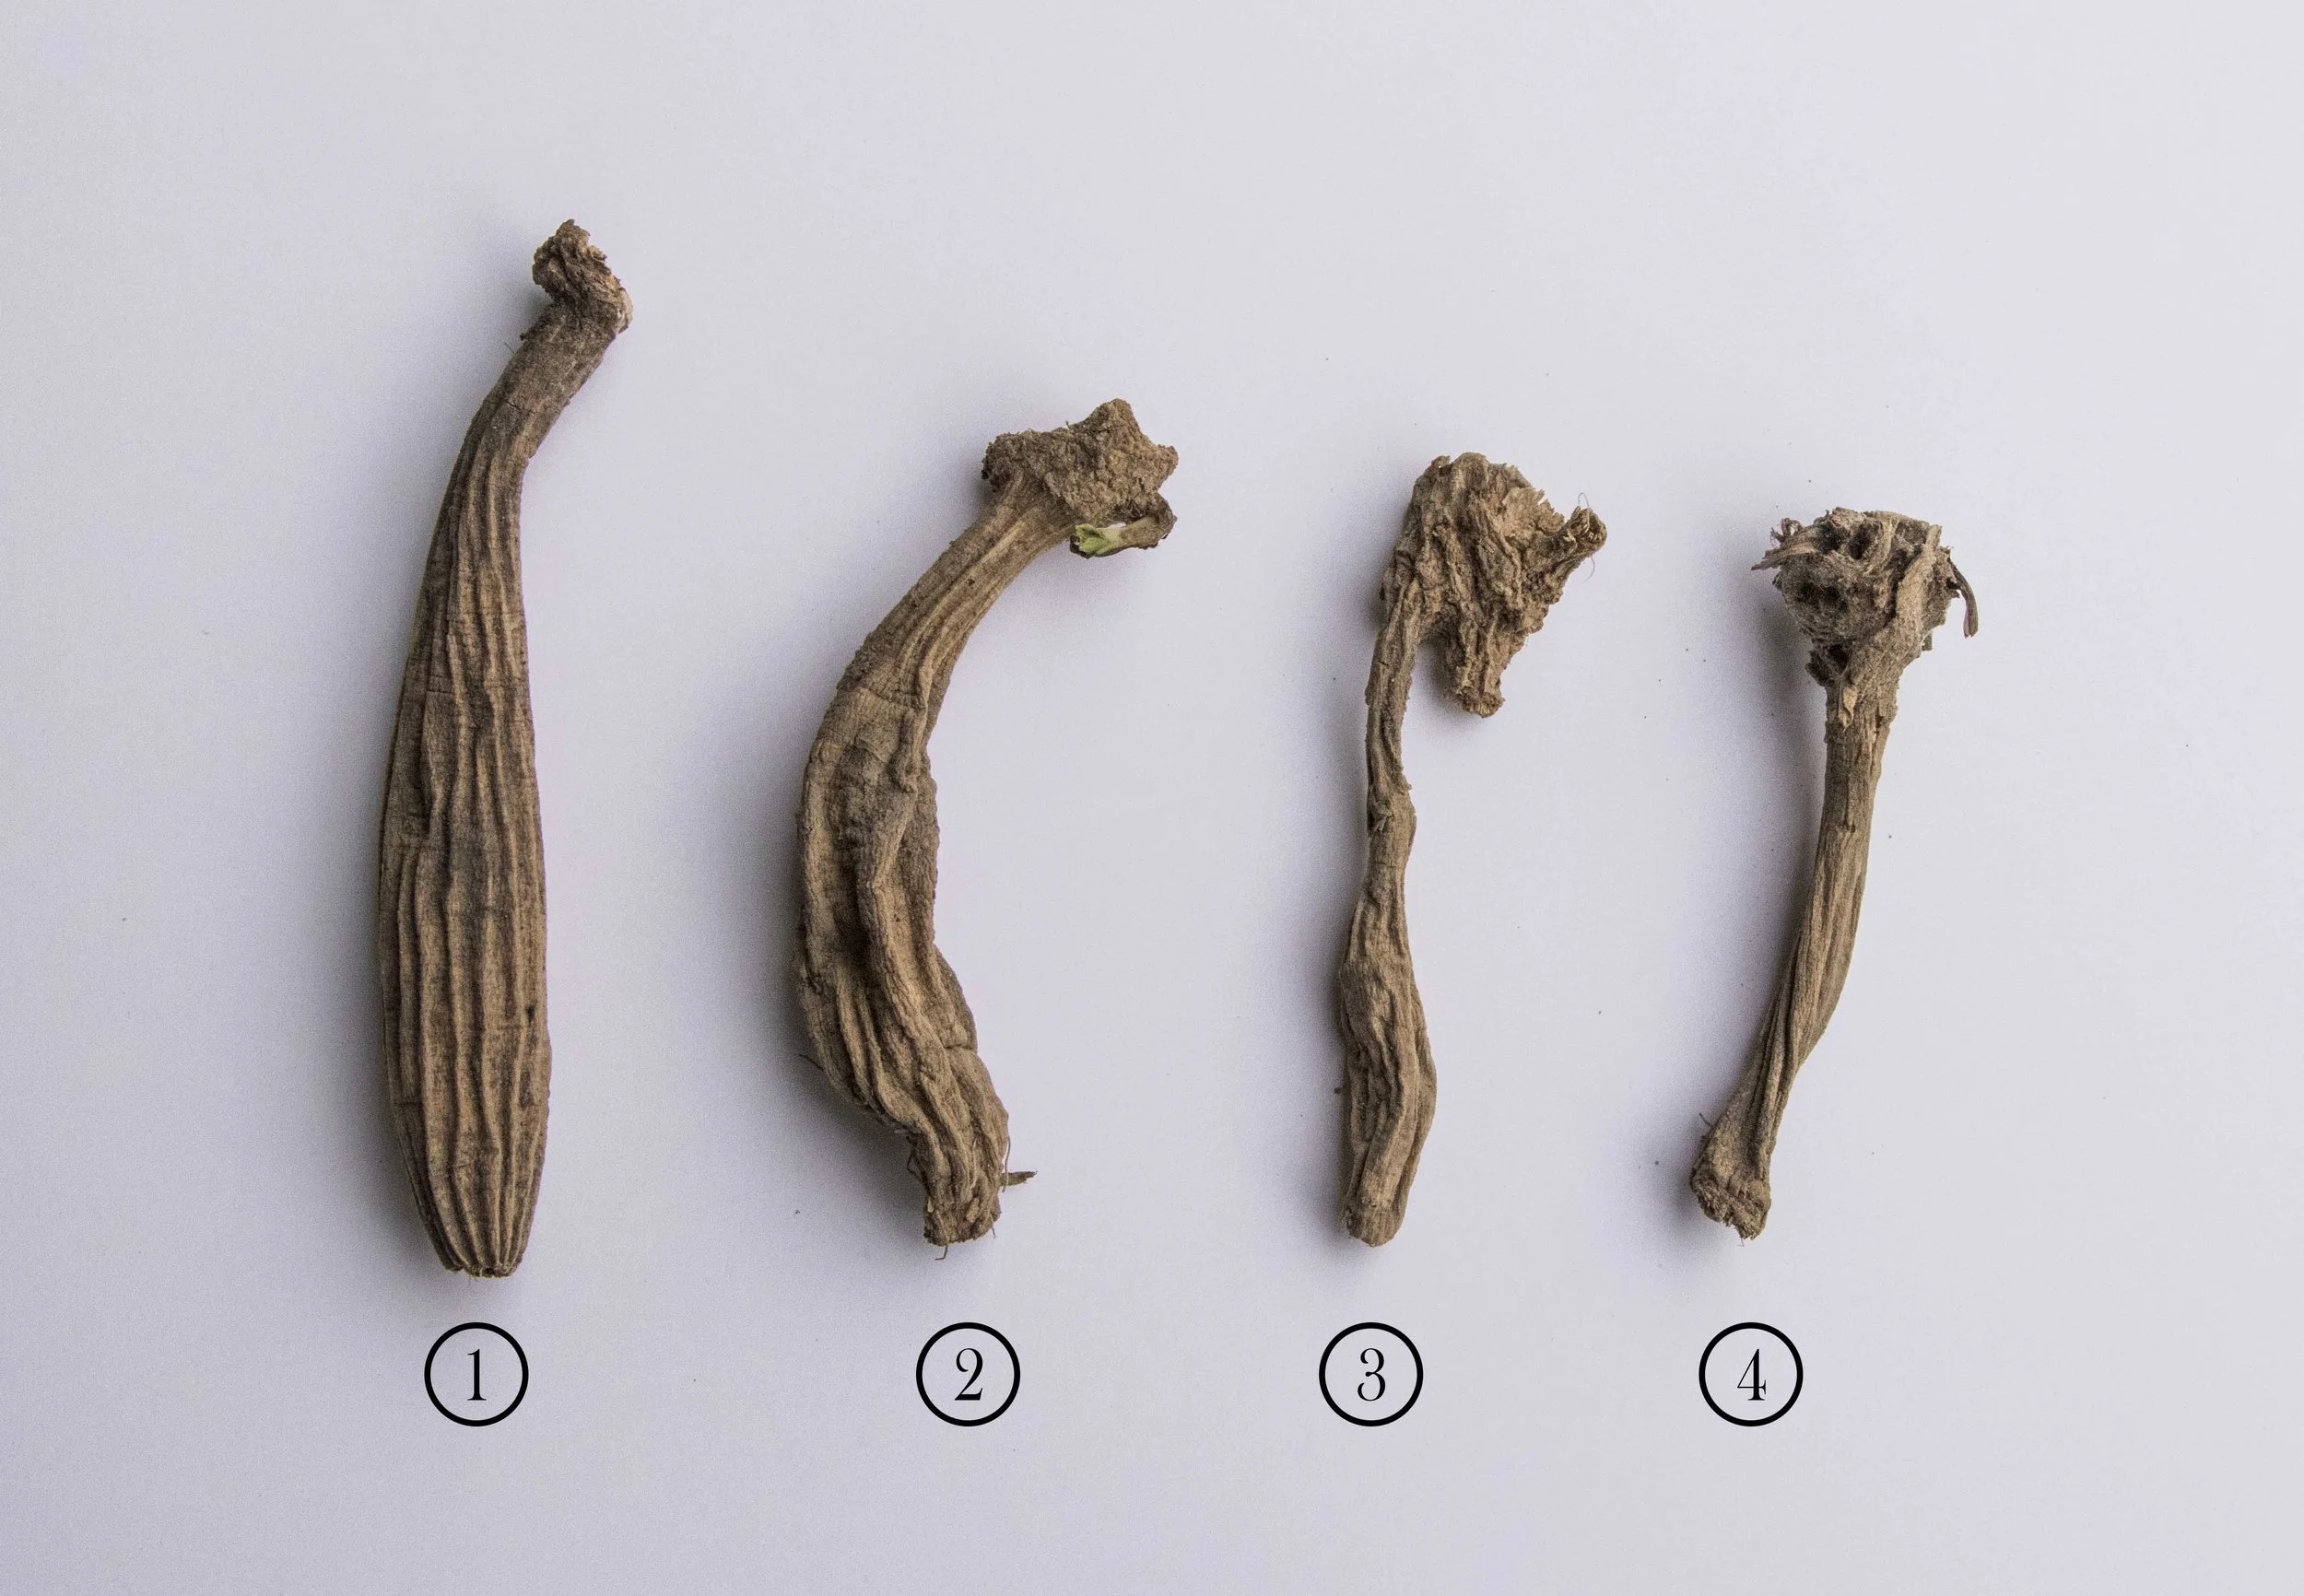
In the photo below, you will see a tubers ranging from perfect with no desiccation (#1) to completely dried out with no hope (#7 - #9). In my field, I will plant anything that looks like #1 - #4 without any hesitation. Each of those will produce a quality plant. With #5 and #6, it is a little more debatable. #5 has an eye actively growing but as you will see in the next photos, that does not guarantee it is viable.
Various states of desiccated dahlia tubers
In the two photos below, you see the same tubers. The first photo shows what the exterior of the tubers looks like and the second shows what the inside of those same tubers looks like after they were cut in half. When you handle a tuber, you can feel if there is any moisture left in it. Although #1 looks really shirred, it was still malleable and you could feel there was moisture inside of it. The same was true for #3, even though it looks arguably worse than #2. Although #2 had a viable eye on it, the tuber than held all the plants energy was completely dried out and would not have been able to support that eye. There was no hope for #4 and looking inside of it confirmed this. In the examples below, I would have planted #1 and #3 in my field but not #2 or #4.
In short, when you are looking at dahlias that seem dried out, it does not mean they will not be viable. You can tell by the feel of the tuber if there is still moisture inside and as long as they are not dried out, they will be fine.
Examples of dried tubers. Look at the next photo too see what they look like inside.
Examples #1 and #3 both still have white flesh inside, while #2 and #4 are completely dehydrated and brown. The black under the tuber are rocks I used to prop them up for the photo.
Tuber Rot
This is for the most part common sense, but I will talk about tuber rot for a moment. If you have a rotten tuber, it won’t grow.
What causes tuber rot? It can be fungal or bacterial. Normally it enters from a cut that was made when you lift or split, from excessive moisture on the tuber, or rot travelling down the stem of the plant into the tuber clump. It will first look brown or black and then travel deeper into the tuber.
When you find rot on your tuber, cut it away until you find only clean, white flesh within the tuber. If you find rot all the way into the neck of the tuber, it is not going to be viable. If you find rot all through the crown attached to that tuber, it is not going to be viable. Sometimes it takes a bit of dahlia surgery, but if you can remove all of the rot, the tuber should be fine.
Below is an example of a dahlia tuber that is not viable due to rot. From the outside it looked fine, but when I picked it up, I felt a soft spot and immediately knew it was not going to be viable since the neck of the tuber was rotten.

It is common to see a little mold growing on the cut ends of a dahlia tuber. A small amount of mold is OK as long as it is superficial and not entering the dahlia tuber and causing rot. You can normally squeeze the end of the tuber and tell if the rot has traveled into it.

An example of some mold growing on the cut end of a dahlia. In cases where there is only a little mold present as in this photo, it normally does not impact the viability of the tuber.
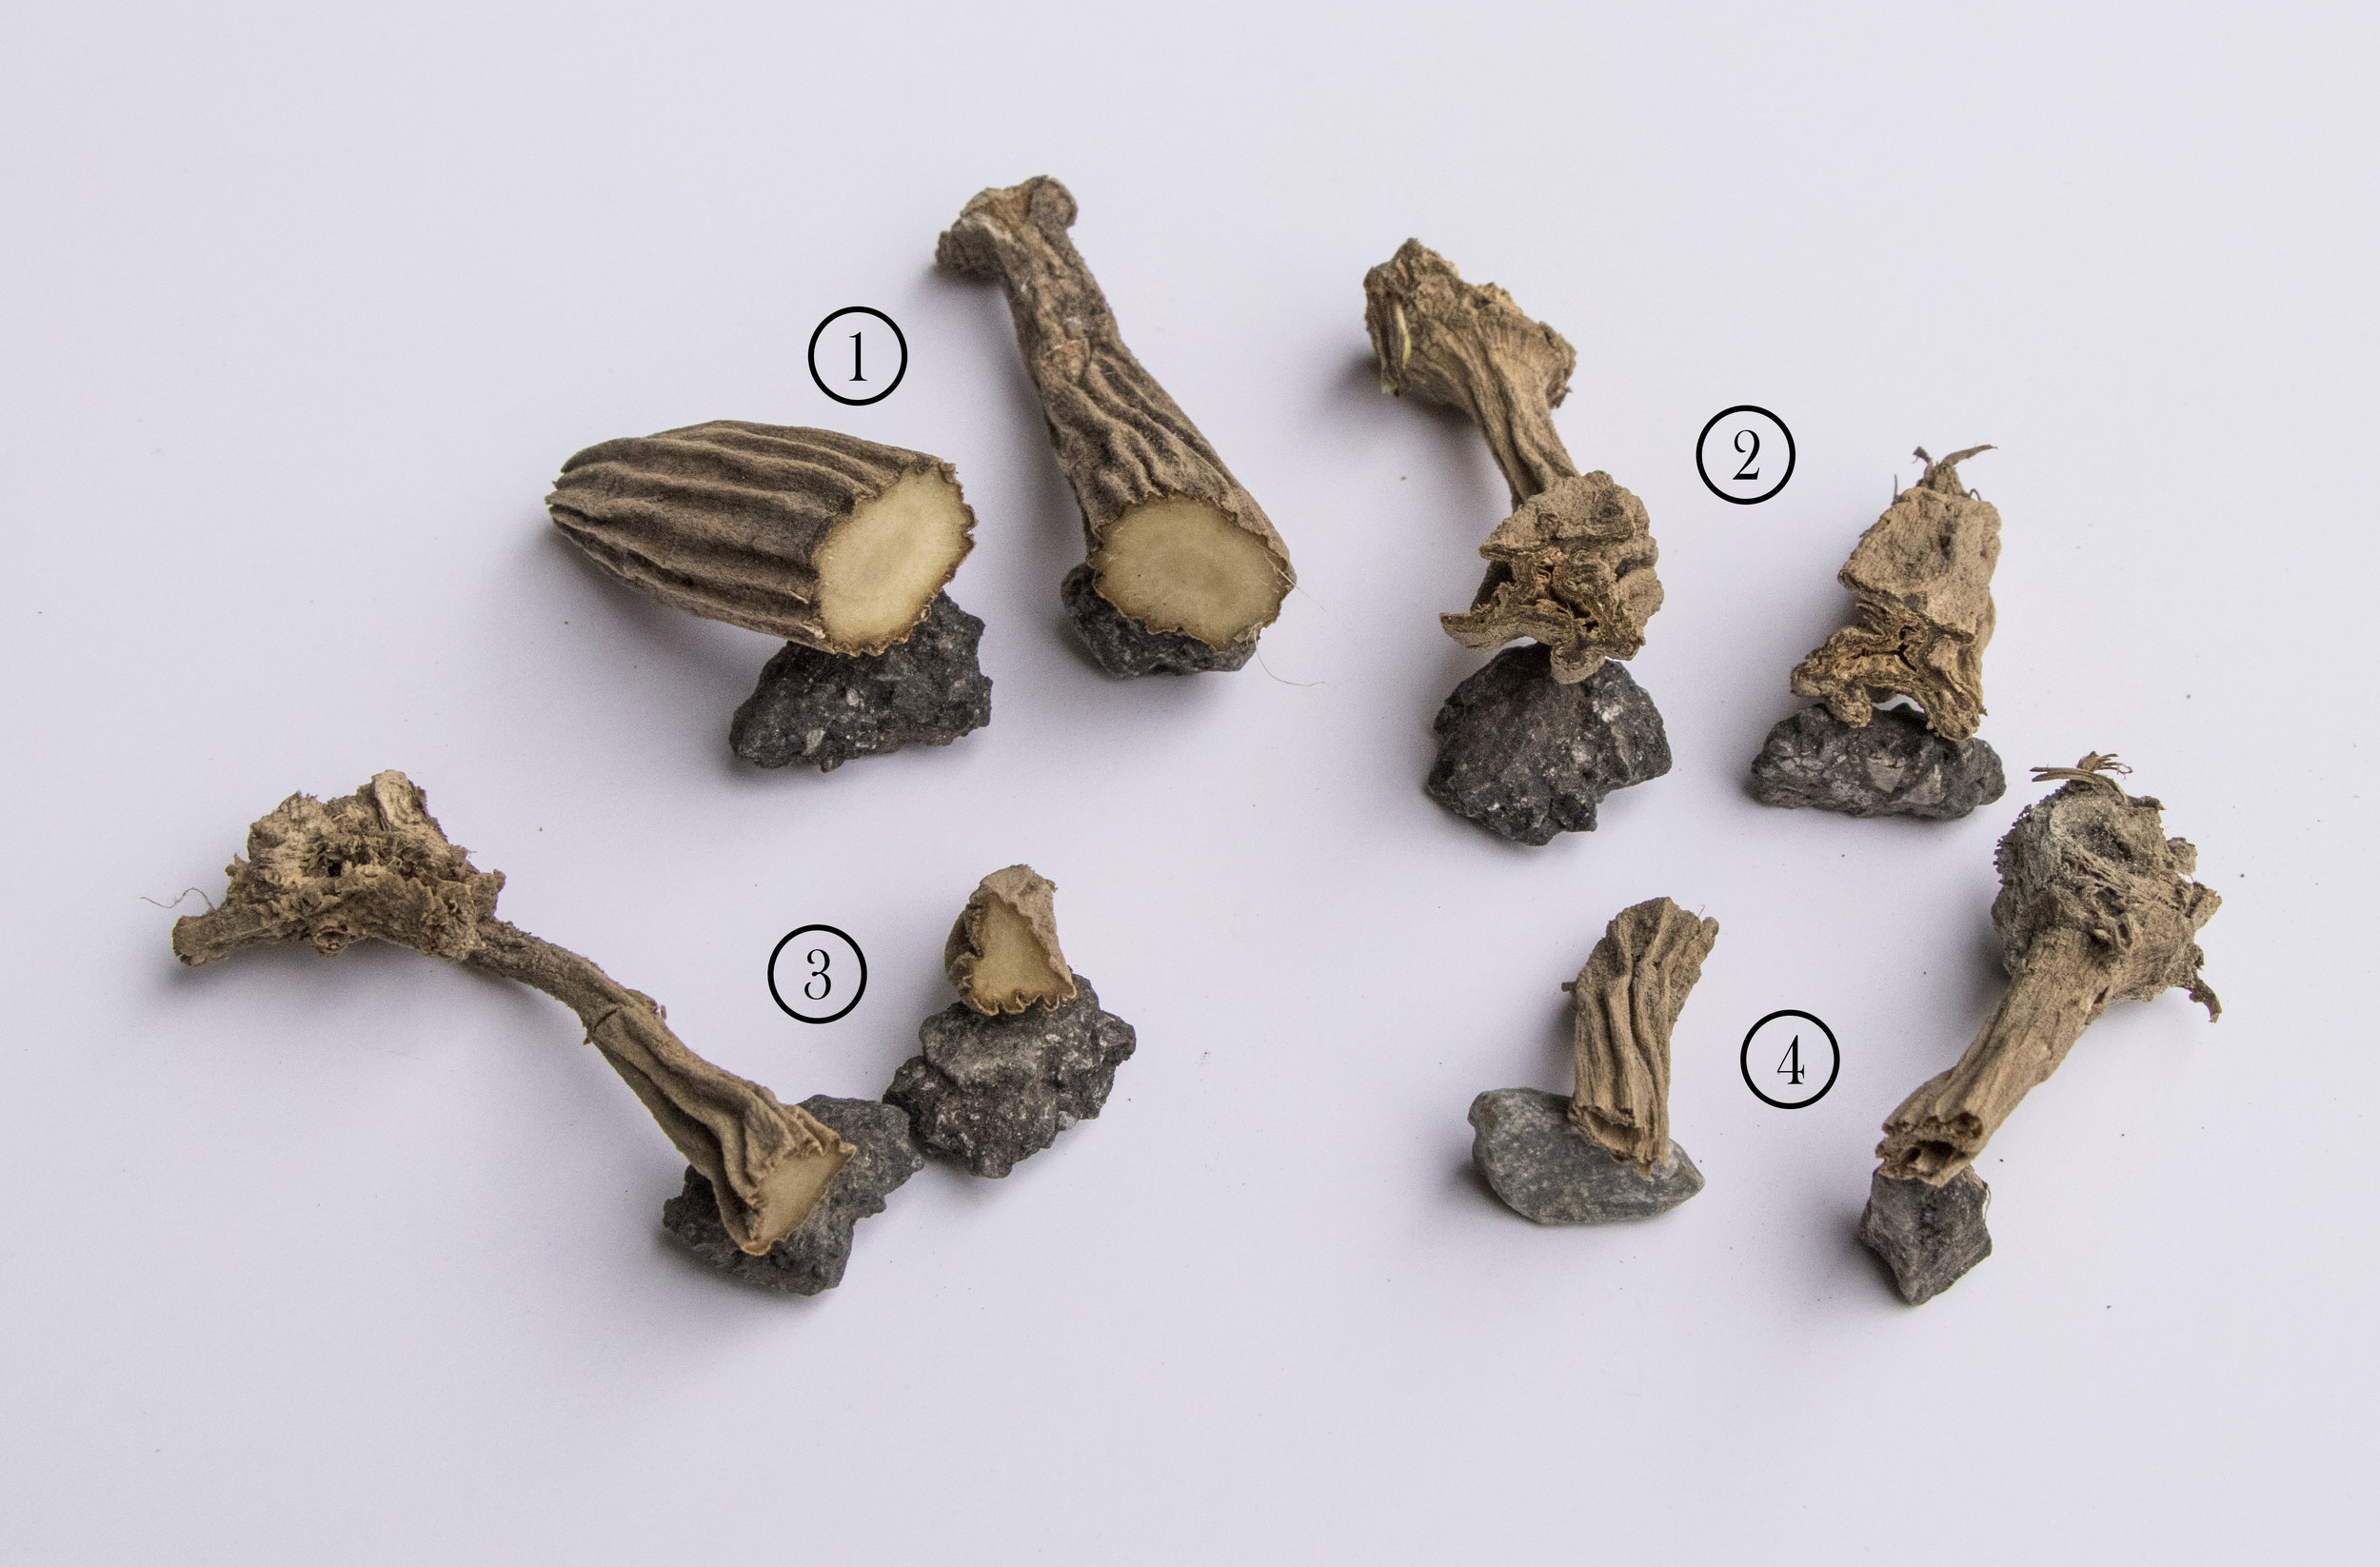
Tuber Eyes, Crown, and Neck
The next most common question I hear from people new to dahlias is a variation of, “This tuber doesn’t have an eye on it, will it grow?”
If you receive a tuber or pull one out of storage and it does not have an eye actively growing on it, don’t panic. Let’s first talk about the structure of a dahlia tuber. There are three important parts of a dahlia tuber. The tuber itself, the neck, and the crown. In the image below, I have color coded the different parts of a tuber: Green = Tuber, Purple = Neck, Pink = Crown. Later in this post I will show these parts closer up during the splitting demo.
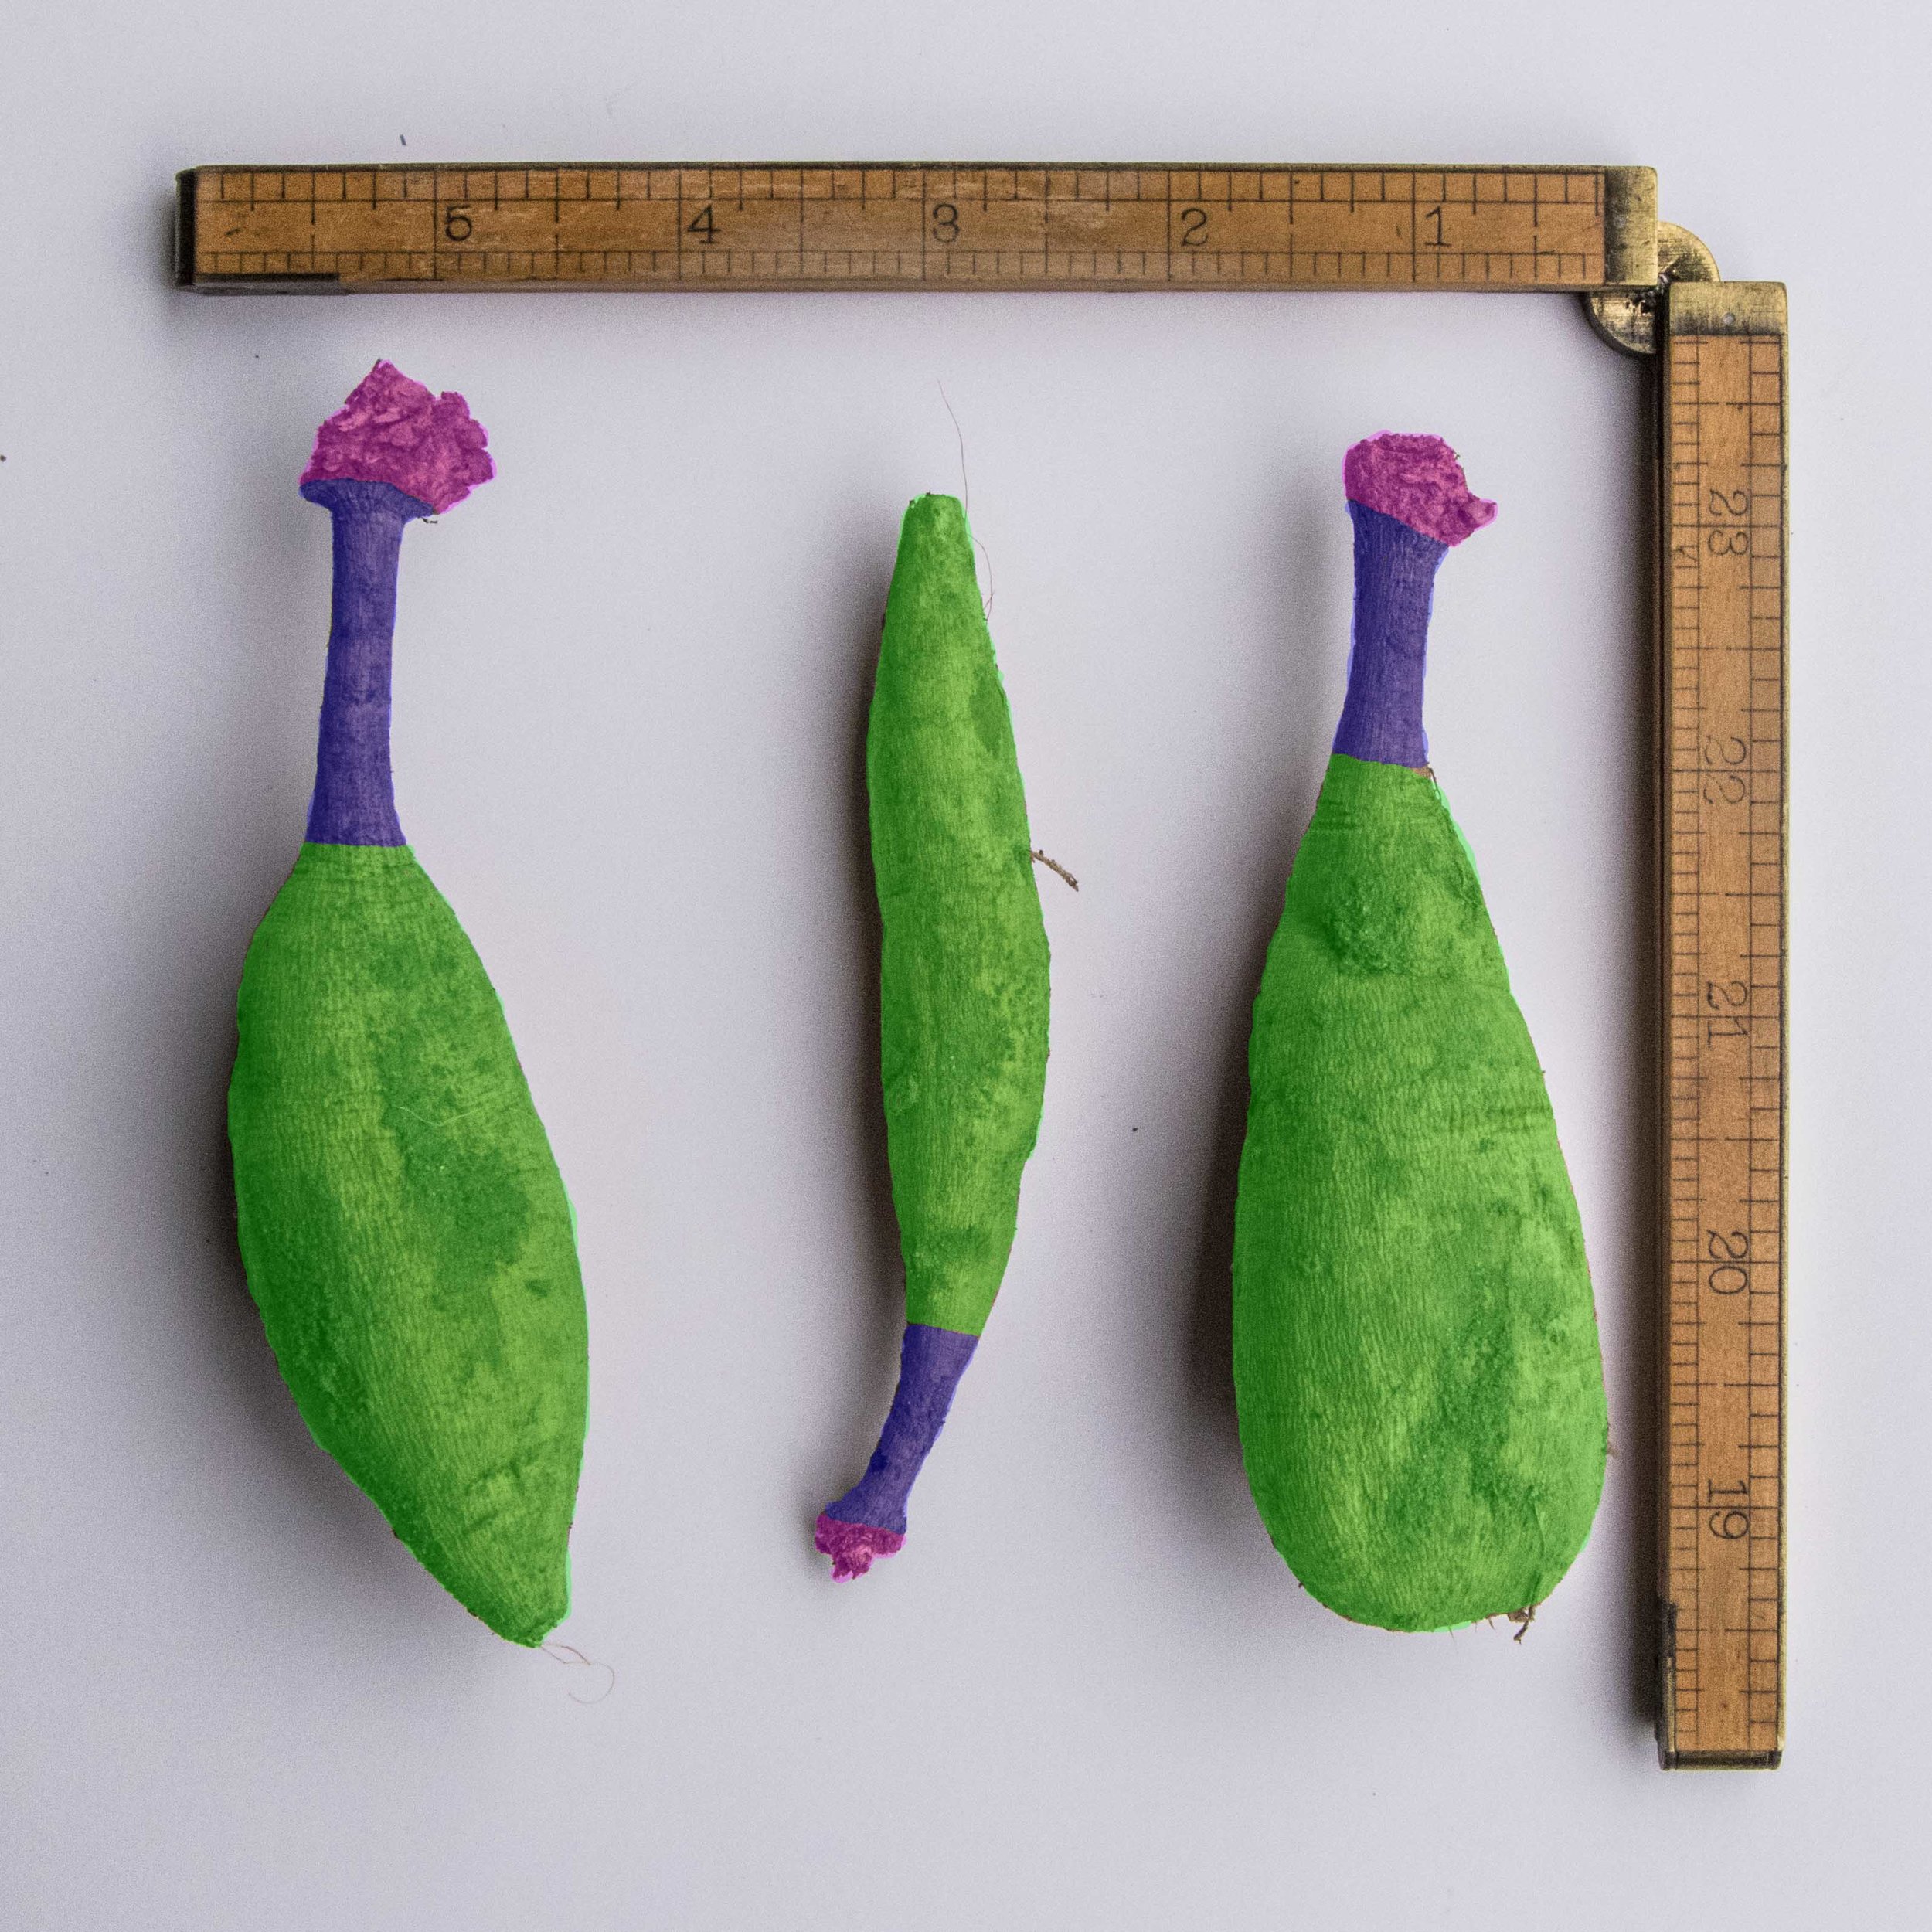
Color coded parts of a tuber. Green is the tuber, purple is the neck. and pink is the crown.
The Crown and Eyes
As I mentioned before, the tuber is what contains everything the dahlia needs to grow. The crown is the only area that eyes will grow from. The neck is the part of the tuber that connect the other two. If you are missing any of these parts on a tuber, it is not going to be viable.
When I am training others how to divide dahlia tubers it is normally shortly after we dig and there are rarely eyes on the clump. What I tell everyone is that if you can keep 1 cm² (about half the area of a dime), of crown attached to a tuber, there is about a 95% chance that there is enough crown for an eye to form. When it comes to mother nature, 95% is about as good as it gets. When planting my own dahlia tubers, I am more concerned with the amount of crown attached to the tuber than whether there is an eye or not.

A dahlia eye growing 1/16” away from the neck of the tuber. The line represents the boundary between the crown and neck. You do not need very much crown attached for eyes to form.
If I receive tubers from another grower, as long as there is enough crown for an eye to form, I do not worry if there is an eye or not. I should also add here that some dahlias take longer to eye up than others. For example, the variety Nicholas commonly takes six or seven weeks to eye up where something like Linda’s Baby can eye up in a week or two.
When handling a tuber with an actively growing eye, sometimes the eye will break off. This is not something to worry about. Dahlia tubers will send up more eyes from where the original broke of. Below is an example of an eye that was cut off for a dahlia cutting and you can see many more eyes pushing up because of it.

Here you can see new eyes growing from the same location the last eye broke off this tuber. If an eye breaks off the crown of your tuber, a new one will form.

Photo used with permission from Clara Joyce Flowers. You can see growth from where the original eye was cut as well as new eyes pushing out.
The Neck
I quickly want to mention the neck on a dahlia tuber. One of the first things I will do when dividing dahlia clumps is to remove all the broken necks. If this connection between the crown and tuber breaks, the tuber cannot send energy to the crown and eyes of the plant. Sometimes it can be difficult to tell if the neck is broken but if you can see inside the neck like in the photo below, it is broken and should be removed. If just the skin is peeled or there is a hairline fracture, that is normally OK and will not hurt the plant.

When you can see those 'strings’ inside the neck of the tuber, it is broken and the tuber should be removed.
Splitting a Dahlia Tuber Clump
By far, the most common question I receive when presenting about dahlias is, “How do I split dahlia tubers?”
Perhaps the scariest part of storing dahlias is dividing them. To help show how we would do it, I took step by step photos while I was splitting a clump of Sweet Nathalie.
Here is what our tuber clump looks like when we pulled it from storage:

Tuber clump viewed from bottom. The darkest tuber is the mother tuber that the plant grew from the prior year.
Step 1: Clean up all the roots at the end of the tubers and any tubers with broken necks. You want to make sure you do cut a bit off the end of each tuber so you can see if there is any rot on the inside of the tuber.

View from the bottom after the roots and tubers with broken necks were removed.
Like I mentioned above, you want to make sure you leave at least 1 cm² of crown attached to each tuber. You can see in the photo below the boundaries between the crown and neck.

The green lines mark the boundary between the neck and the crown. You can see a clear change in the texture of the skin between the two areas and there is often a small ridge marking the boundary line.
Step 2: My first split will more or less break the clump in two so I can split it down further. I am not trying to save the mother tuber on this clump so I am cutting through part of it with this split.

Splitting the dahlia tuber clump in two.
Step 3: Here I am further breaking down the tuber, splitting it in half again.

Splitting the half we just cut off in half again.

A close up of the previous picture. Notice the eyes (slightly darker) on the left and right of the clipper just starting to emerge.
Step 4: Further Breaking down the tubers by splitting them in half again. I am making sure to keep at least 1 cm² of crown attached to each tuber.

Step 5: I like to remove as much of the stem as possible from the dahlia tubers. It is not only a common source of rot in tubers, but can be a vector for spreading invasive insects.

Removing the stem from the crown. You can see how it the crown has white flesh and the stem is dried out.

A view from the other side when removing the stem. You can again see the difference in texture.
Step 6: Here I am removing the mother tuber. I will occasionally save the mother tuber if it looks healthy and I do not have many tubers to plant. If you are saving the tuber, make sure there is new crown attached to it, not just the same crown from the year before. This way it is more likely to develop eyes. In this case I have lots of this variety so there is no need to save it.

Removing the mother tuber.
A view from the other side removing the mother tuber
Step 7: I am splitting one of the three remaining tubers off. The other two I will keep together because they are both on the smaller side. By keeping them together, their combined size is greater than that of a AAA Battery. You can also see an example of a hairline fracture in the neck I mentioned before that is acceptable and should not affect the tuber.

Breaking these three tubers in to two.
And that is it! Once you have split these for a little while, it really starts to make sense. If you are afraid to split them into individuals like I did here, you could easily just split this clump into three or four pieces and have lots of success with it!

All done! AA Battery for size reference. That one clump will turn into eight new plants!
Whew! This took me a lot longer to put together than I realized it would! I hope you found this guide helpful. If you did, make sure you share it with all your fellow dahlia addicts!
-Michael